How to Shade Your Outside AC Unit-8 Distinctive Methods
The smart way to improve indoor AC performance is to protect the outdoor AC unit from direct sunlight. This not only improves its efficiency but also enhances its faculty. It can reduce your energy bills and extend your device’s lifespan.
But the question is, how to shade your outside AC unit?
Don’t worry; we are here to help. We have discussed eight methods, each with advantages and disadvantages, for shading your AC unit.
Stay with us to learn all the methods and choose which will suit your condition.
How to Shade Your Outside AC Unit – 8 Distinctive and Effective Methods
Method 1: Install an Awning
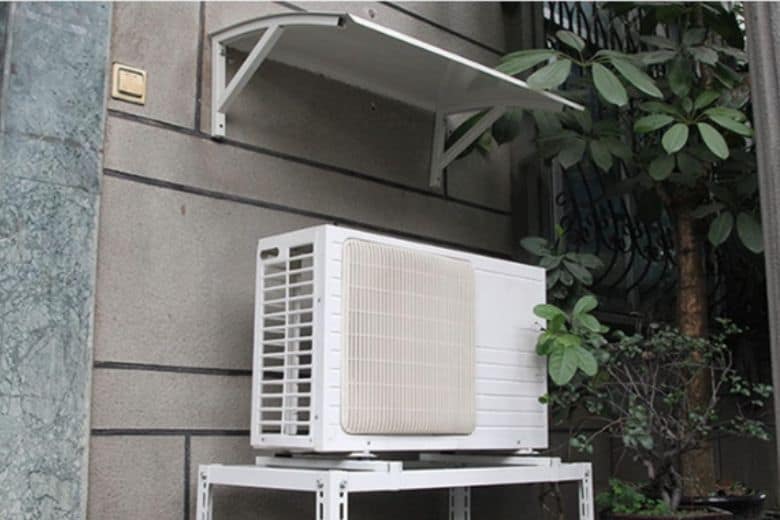
Installing an awning is an effective and aesthetically pleasing way to shade your outside AC unit. This method provides reliable protection from the sun while adding a decorative element to your home’s exterior.
Step-by-Step Guide:
Measure the area above your AC unit to determine the appropriate awning size.
Choose a durable, weather-resistant material such as canvas or metal.
Purchase an awning kit or have one custom-made to fit your specifications.
Install mounting brackets on the exterior wall above the AC unit.
Attach the awning to the brackets according to the manufacturer’s instructions.
Ensure the awning is securely fastened at the correct angle for optimal shade.
Pros:
- It provides excellent sun protection
- Adds aesthetic value to your home
- It can be retractable for flexibility
- Protects the unit from rain and debris
Cons:
- It may be expensive, especially for custom installations
- Requires proper installation to avoid damage to your home’s exterior
- It may need periodic maintenance or replacement due to weather exposure
Estimated Costs
- DIY kit: $200 – $500
- Professional installation: $500 – $3,500
- Custom-made awnings can cost upwards of $5,000
Method 2: Plant Trees or Shrubs
Using natural landscaping to shade your AC unit can be an eco-friendly and visually appealing option. Carefully selected plants can provide excellent shade while enhancing your yard’s appearance.
Step-by-Step Guide:
Choose appropriate plants that thrive in your climate and grow to a suitable height.
Ensure the mature size of the plants won’t interfere with the AC unit’s airflow.
Plan the planting location, allowing at least 3-5 feet of clearance around the unit.
Prepare the soil and plant your chosen trees or shrubs.
Water and maintain the plants regularly to encourage healthy growth.
Trim the plants as needed to maintain proper clearance and shape.
Pros:
- Environmentally friendly option
- Improves landscaping aesthetics
- It provides a natural cooling effect beyond just shading the AC unit
- Can increase property value
Cons:
- It takes time for plants to grow and provide adequate shade
- Requires ongoing maintenance and care
- It may attract insects or wildlife if not properly managed
- Root systems could potentially interfere with the AC unit’s foundation over time
Estimated Costs
- Small trees or shrubs: $20 – $100 per plant
- More extensive, mature trees: $200 – $1,000+ per tree
- Professional landscaping services: $500 – $3,000+
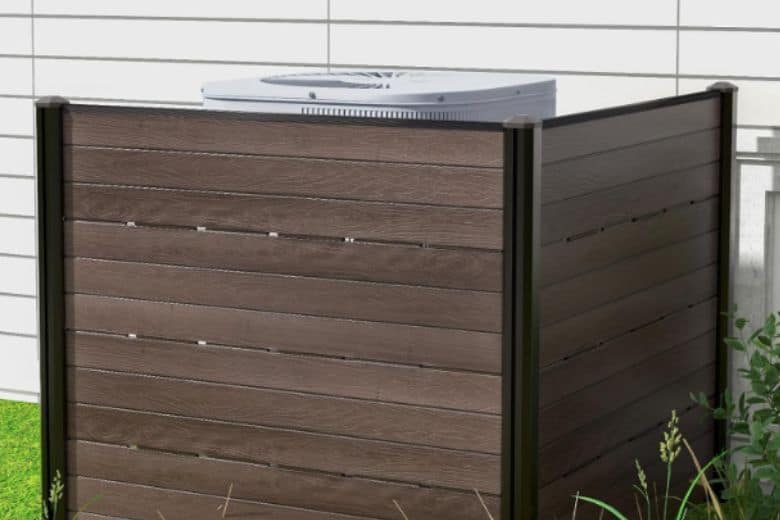
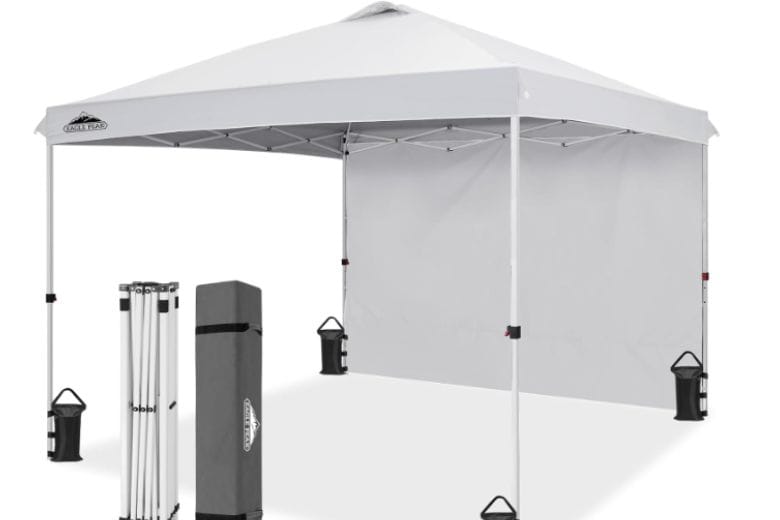
Method 3: Build a Shade Structure
Constructing a dedicated shade structure for your AC unit offers a customizable and potentially long-lasting solution.
Step-by-Step Guide:
Design a simple structure that allows for proper airflow around the AC unit.
Choose weather-resistant materials such as treated wood, metal, or vinyl.
Ensure the structure’s dimensions allow for at least 3 feet of clearance on all sides.
Build a sturdy frame using posts and crossbeams.
Install a roof or slatted top to provide shade while allowing heat to escape.
Consider adding removable sides for additional protection during severe weather.
Pros:
- Highly customizable to fit your specific needs and aesthetics
- It can provide excellent shade and protection from the elements
- Potentially long-lasting if built with quality materials
- It can be designed to complement your home’s architecture
Cons:
- It may require significant time and effort to construct
- It could be costly depending on materials and complexity
- It might require permits or approval from the homeowners’ association
- Permanent structures may affect property value or future landscaping plans
Estimated Costs
- DIY materials: $200 – $1,000
- Pre-fabricated kits: $500 – $2,000
- Professional construction: $1,500 – $5,000+
Method 4: Use a Shade Sail
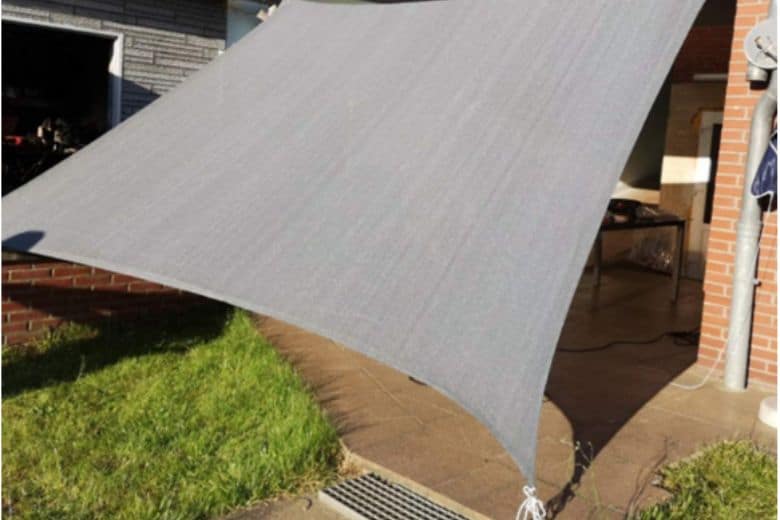
Shade sails offer a modern, flexible solution for shading your outside AC unit. They’re relatively easy to install and can be adjusted or removed.
Step-by-Step Guide:
Measure the area you want to shade, including the AC unit and surrounding space.
Choose a high-quality, UV-resistant shade sail fabric.
Determine attachment points on your house or sturdy posts.
Install heavy-duty anchors or mounting points.
Attach the shade sail using appropriate hardware, ensuring it’s taut but not overstretched.
Adjust the angle for optimal sun blockage throughout the day.
Pros:
- Relatively inexpensive compared to permanent structures
- Easy to install and remove
- Available in various colors and shapes to suit your style
- Provides good airflow while blocking sunlight
Cons:
- It may need to be removed during high winds or severe weather
- Fabric may degrade over time and require replacement
- Less effective in blocking rain compared to solid structures
- Proper installation is crucial to prevent sagging or damage
Estimated Costs
- DIY kit: $50 – $300
- Custom-made sail with professional installation: $500 – $1,500
Method 5: Use Portable Shade Panels
Portable shade panels offer a flexible, non-permanent solution for shading your AC unit. They can be easily moved or stored when not needed.
Step-by-Step Guide:
1st, measure the dimensions of your AC unit and surrounding area.
Purchase or build lightweight, weather-resistant panels sized appropriately.
Choose materials like bamboo, wood slats, or outdoor fabric for the panels.
If building, construct frames and attach your chosen shading material.
Position the panels around the AC unit, leaving adequate space for airflow.
Secure the panels with stakes or weights to prevent tipping in windy conditions.
Pros:
- Highly flexible and easy to adjust
- It can be stored during off-seasons or severe weather
- Relatively inexpensive, exceptionally if DIY
- Easy to replace or update as needed
Cons:
- It may not provide as much protection as permanent solutions
- Requires storage space when not in use
- Could be knocked over by strong winds if not adequately secured
- It may not be as visually appealing as more integrated solutions
Estimated Costs
- Pre-made panels: $50 – $200 per panel
- DIY materials: $100 – $300 for a set
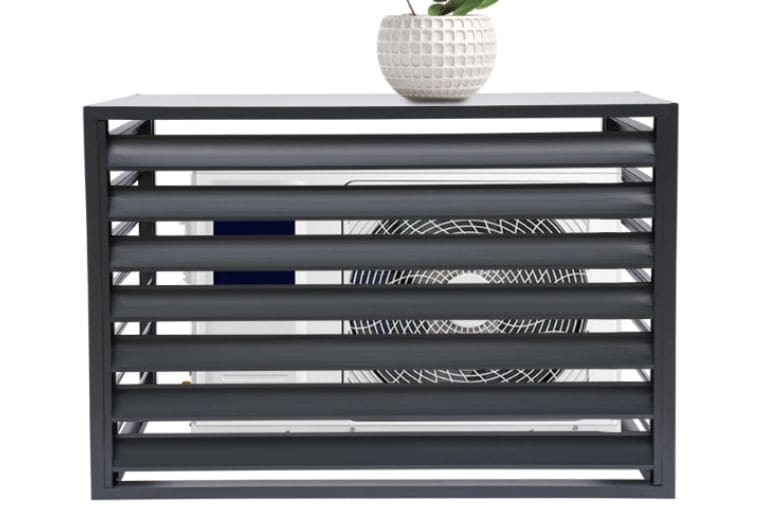
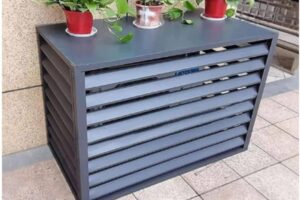
Method 6: Install Louvered Panels
Louvered panels offer an elegant and effective solution for shading your outside AC unit while maintaining good airflow.
Step-by-Step Guide:
Measure the area around your AC unit, allowing for at least 3 feet of clearance on all sides.
Choose weather-resistant materials such as vinyl, aluminum, or treated wood for the panels.
Design the panel layout, ensuring the louvers are angled to block sunlight but allow air circulation.
Build or purchase pre-made louvered panels to fit your specifications.
Install sturdy posts or a frame to support the panels.
Attach the louvered panels to the frame, ensuring they’re securely fastened.
If desired, paint or stain the panels to match or complement your home’s exterior.
Pros:
- It provides excellent sun protection while allowing airflow
- It can be customized to match your home’s architectural style
- Durable and long-lasting if made with quality materials
- It can offer some protection from debris and small animals
Cons:
- It may be more expensive than simpler shading options
- Requires careful design to ensure proper airflow
- Installation can be complex and may require professional help
- Fixed panels may not adapt to changing sun angles throughout the year
Estimated Costs
- DIY materials: $300 – $1,000
- Pre-made panels: $500 – $2,000
- Professional installation: $1,000 – $3,000+
Method 7: Use a Retractable Canopy
A retractable canopy offers a flexible and adjustable solution for shading your outside AC unit, allowing you to provide cover only when needed.
Step-by-Step Guide:
Measure the area above and around your AC unit to determine the appropriate canopy size.
Choose a durable, weather-resistant canopy material like polyester or acrylic fabric.
Select a retractable canopy system that fits your needs (manual or motorized).
Install mounting brackets on a wall or sturdy posts near the AC unit.
Attach the canopy mechanism to the mounting brackets according to the manufacturer’s instructions.
Extend the canopy and adjust its angle to provide optimal shade for your AC unit.
Retract the canopy when not needed or during severe weather conditions.
Pros:
- Offers flexibility to shade the AC unit only when necessary
- It can be easily retracted for maintenance access or during off-seasons
- Available in various sizes and styles to suit different aesthetics
- Protects the AC unit from both sun and light rain when extended
Cons:
- The initial cost can be higher, especially for motorized systems
- Requires regular maintenance to ensure smooth operation
- Fabric may need replacement over time due to weather exposure
- It may not be suitable in areas with frequent high winds
Estimated Costs
- Manual system: $200 – $500
- Motorized system: $500 – $2,000
- Professional installation: Add $300 – $1,000
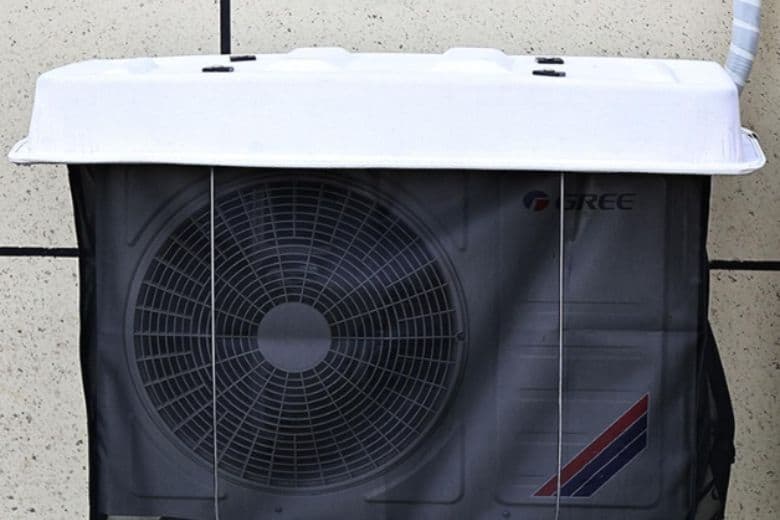
Method 8: Use a Specialized AC Cover
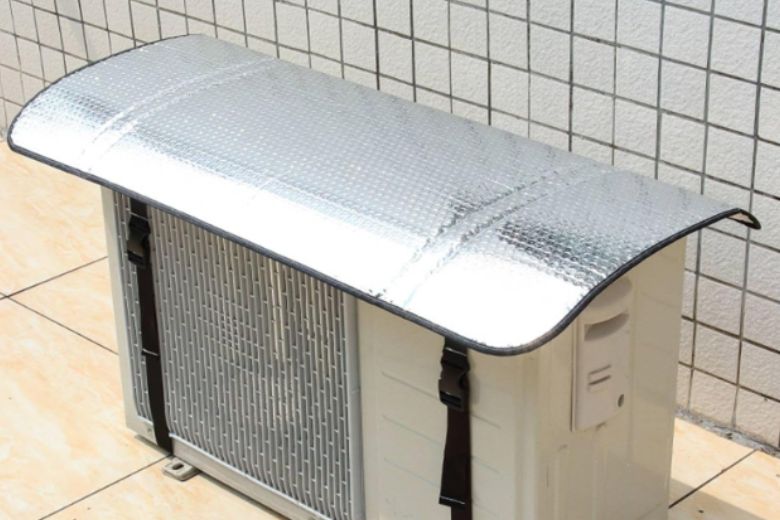
A specialized AC cover designed for outdoor units can protect from direct sunlight while allowing for proper ventilation. This method balances shade and airflow, potentially improving your unit’s efficiency.
Step-by-Step Guide:
Measure your AC unit’s dimensions, including height, width, and depth.
Choose a high-quality, breathable AC cover designed for sun protection. Look for materials like mesh or specially designed fabrics that block UV rays but allow air circulation.
Ensure the cover is the correct size for your unit, allowing for a snug but not tight fit.
Clean the area around your AC unit to remove any debris.
Carefully place the cover over your AC unit, ensuring it’s centered and properly aligned.
Secure the cover using any provided straps or fasteners.
Adjust the cover as needed to ensure maximum shade coverage while maintaining proper ventilation.
Pros:
- Designed explicitly for AC units, balancing shade and airflow
- Easy to install and remove
- Portable and can be stored when not in use
- Often more affordable than permanent structures
- Can provide some protection from debris and small animals
Cons:
- It may not provide as much shade as larger structures or awnings
- Requires regular cleaning and maintenance to prevent mold or mildew growth
- It may need replacement every few years due to wear and tear
- Not suitable for extreme weather conditions and may need to be removed during storms
Estimated Costs:
- Basic mesh AC covers: $30 – $80
- Premium, UV-resistant covers: $80 – $200
- Custom-made covers: $150 – $300+
Factors That Affect the Need for AC Unit Shading
The degree to which you need to shade your outdoor AC unit can depend on several key factors:
# Climate: Regions with intense, direct sunlight and high outdoor temperatures will benefit more from shading than milder, cloudy climates.
# Unit Placement: AC units in direct, unobstructed sunlight require more protection than those in partially shaded areas.
# Unit Size: Larger AC units tend to generate more heat and can experience more significant performance impacts from sun exposure.
# Home Orientation: The direction your home faces and the placement of the AC unit relative to the sun’s path affects how much direct sunlight it receives.
# Budget: Balance the cost of materials and installation with potential energy savings.
# Durability: Select materials and methods that can withstand local weather conditions.
# Local Regulations: Check for any restrictions or permits required for outdoor structures.
Additional Cost Considerations:
# Permits: Check with your local authorities; costs can range from $50 to $500+
# Maintenance: Annual costs for cleaning, repairs, or replacements can range from $50 to $500 depending on the method chosen
# Energy Savings: While not a direct cost, consider potential savings on your energy bill, which could be $50 – $200+ annually, depending on your climate and AC usage
Best Practices for Shading Your Outside AC Unit:
While the best method may vary depending on individual circumstances, some general best practices include:
- Ensure adequate airflow: Maintain at least 3 feet of clearance around the unit.
- Use light-colored materials: Lighter shades reflect more sunlight and heat.
- Opt for adjustable solutions: Flexibility allows for optimal shading as seasons change.
- Combine methods: For example, use landscaping and a shade structure for comprehensive protection.
- Regular maintenance: Keep your shading solution clean and in good repair for best results.
Final Words
Shading your outside AC unit is a simple and effective way to enhance its performance and lifespan. Consequently, considering all the abovementioned methods, the best practice for shading your outdoor AC unit is to build a custom, permanent enclosure or trellis/pergola structure. These solutions provide the most comprehensive and long-lasting shading and the ability to optimize airflow and integrate with your home’s aesthetic.