
How to Use a Ge Dishwasher? A Step-by-Step Guide
Did you buy a new GE dishwasher and don’t know how to use it correctly? Don’t worry—we are here to help you understand all the features and functions of the new device.
We will educate you on everything from preparing it for first-time use to loading technique and selecting the right wash cycle for your needs and its different features.
So, without further words. Let’s learn how to use a GE dishwasher successfully.
How to Prepare GE Dishwasher for First-Time Use
The first thing you must do before using your new GE dishwasher is prepare it properly. This initial setup is mandatory for its overall performance. Here’s how to get your GE dishwasher ready for its first use:
# Remove all Packaging Materials: Remove any plastic wraps, foam, or other protective packaging from the interior and exterior of the dishwasher. Make sure there are no stray pieces of material that could interfere with the dishwasher’s operation.
# Clean the Interior: Use a damp cloth or paper towel to wipe down the dishwasher’s interior, including the racks, tub, and any removable parts. This will help remove manufacturing residues or dust accumulated during shipping and storage.
# Check the Water Supply and Drainage Connections: Ensure that the water supply line is correctly connected to the hot water inlet on the back of the dishwasher and that the drainage hose is securely attached to the drain pipe or garbage disposal. Test for leaks and tighten connections when necessary.
# Read the Owner’s Manual: Take the time to read thoroughly through the GE dishwasher’s owner’s manual. This will provide valuable information about your model’s specific features and functions, as well as essential safety instructions and recommendations for optimal use.
# Install the Dishwasher: If not already done, install it according to the manufacturer’s instructions, ensuring it’s level and securely in place.
# Add Rinse Aid: Now locate the rinse aid dispenser (usually inside the door) and fill it with a quality rinse aid. This helps prevent water spots and improves drying performance.
# Run an Empty Cycle: Before loading any type of dishes, run an empty cycle using a dishwasher cleaner or white vinegar to clean the interior and remove any manufacturing residues.
# Check Water Hardness: Test your water hardness and adjust the dishwasher’s settings accordingly. This step is crucial for optimal cleaning performance and preventing mineral buildup.
How to Use the GE Dishwasher Properly
Proper loading is one of the main parts of cleaning dishes and ensuring optimal performance. Here, we have included the accurate way of loading your GE dishwasher:
Stage 1: Scrape, Don’t Rinse
Modern GE dishwashers are designed to handle food particles. Simply scrape off large food debris before loading; pre-rinsing is usually unnecessary and wastes water.
1. Upper Rack Loading
- Place glasses, cups, and small bowls upside down to prevent water pooling.
- Use stemware holders for wine glasses if available.
- Load plastic items here, as they’re further from the heating element.
2. Lower Rack Loading
- Place larger items like plates, pots, and pans here.
- Angle dirty surfaces towards the center for better spray coverage.
- Don’t let items block the detergent dispenser.
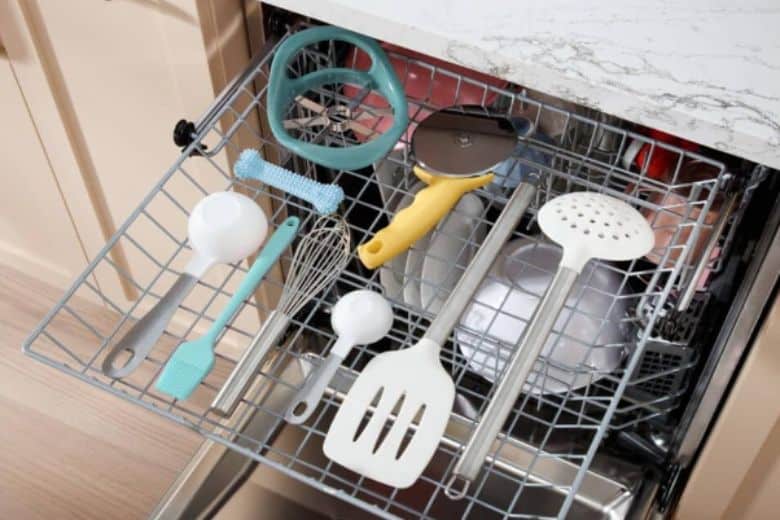
3. Silverware Basket Loading
- Mix spoons, forks, and knives to prevent nesting.
- Place knives with handles up for safety.
- Some models have a third rack specifically for utensils.
Stage 2: Avoid Overloading
Leave space between items for water and detergent to circulate freely. Generally, you’ll want to place items with food residue facing the center of the dishwasher and avoid nesting or overlapping dishes, as this can prevent proper water circulation and coverage.
Stage 3: Check Spray Arms
Carefully slide out the upper and lower racks to access the spray arms. GE dishwashers typically have two or three spray arms – one at the bottom, one in the middle (attached to the top rack), and sometimes one at the top of the tub. Ensure they can rotate freely without hitting any dishes.
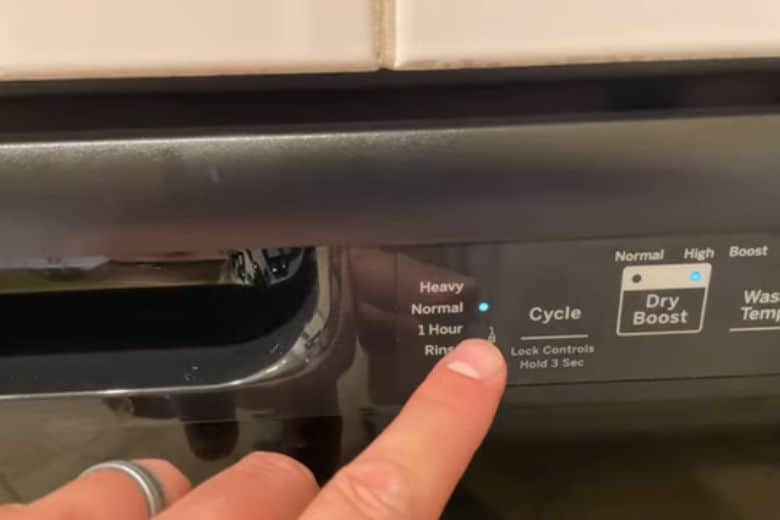
How to Use Different Wash Cycles of Your GE Dishwasher

GE dishwashers offer various wash cycles to cater to different cleaning needs. We have included the most typical cycles and when to use them:
# Normal Wash: Ideal for everyday loads with mixed items and average soil levels.
# Heavy Wash: Perfect for pots, pans, and heavily soiled dishes. Uses higher temperatures and longer wash times.
# Light Wash: Suitable for lightly soiled items or when you’re in a hurry. Uses less water and energy.
# Express Wash: A quick cycle is for lightly soiled dishes when you need them cleaned fast.
# Rinse Only: Useful for rinsing dishes you plan to wash later, preventing odors and stuck-on food.
# Sanitize: Uses very high temperatures to eliminate bacteria. Great for baby items or when someone in the household is ill.
# Auto Sense: This smart cycle adjusts water usage, temperature, and time-based on the soil level of your dishes.
Note:
To select a cycle, press the corresponding button on the control panel. Some models may have a dial or touch controls instead. Moreover, you can consult your GE dishwasher’s owner’s manual to understand the specific cycle options and their recommended uses.
GE Dishwasher Special Features and Their Purpose
1. Adjustable Racks: Many GE models feature racks that can be adjusted to accommodate taller items, such as wine glasses or large pots.
2. Silverware Basket: This removable basket organizes and separates silverware for neat and thorough cleaning.
3. Rinse Aid Dispenser: Rinse aid helps prevent water spots and improve drying, so keeping the dispenser filled is essential.
4. Delay Start: This feature allows you to set the dishwasher to start later, which can help take advantage of off-peak energy rates.
5. Steam Prewash: Uses steam to loosen tough, baked-on foods before the main wash cycle begins.
6: Bottle Jets: Special jets designed to clean the insides of tall items like water bottles and vases.
7. Piranha Hard Food Disposer: Grinds up food particles to prevent clogging and eliminate the need for a filter.
8. Dry Boost: Enhances drying performance, especially useful for plastic items.
9. Wi-Fi Connect: You can remotely control and monitor your dishwasher via a smartphone app.
10. Third Rack: An additional rack for flat items and utensils, increasing overall capacity.
11. Adjustable Tines: Flexible tines can be folded to accommodate more oversized items.
Note:
To use these features, consult your dishwasher’s control panel or user manual for specific instructions. Besides, you should know that not all GE dishwasher models have all these features. These are all features Ge dishwasher offers, and include these features depending on the dishwasher price and model.
Tips for Optimal Performance
To get the best results from your GE dishwasher, keep these tips in mind:
- Always use detergent specifically designed for dishwashers. Gel detergents are generally less effective than powder or tablet forms.
- More isn’t always better. Follow the recommendations based on your water hardness and load size.
- Keep the rinse aid full, improving drying performance and preventing water spots.
- Clean your model monthly to maintain optimal performance if it has a removable filter.
- Run hot water before starting to ensure the dishwasher begins with hot water for better cleaning.
- Use the dishwasher regularly because it helps prevent odors and keeps seals from drying out.
- Load efficiently to maximize space without overcrowding for proper water circulation.
- Consider using a water softener or dishwasher-specific hard water treatment if you have hard water.
Final Words
Using a GE dishwasher significantly helps you with your kitchen routine and maintaining consistency in clean dishes. However, each GE dishwasher model may have slight variations in features and controls, so always refer to your specific user manual for detailed instructions.


One Comment